Haproxy实战:80端口转发到webserver和ssh

服务器原来配置了haproxy,因为对外只开放了80端口,没有开放22端口,所以haproxy配置了端口转发,规则如下(在/etc/haproxy/haproxy.cfg):

#By http://blog.creke.net/
global
    maxconn 5120
    chroot /usr/share/haproxy
    daemon
    quiet
    nbproc 2
    pidfile /usr/share/haproxy/haproxy.pid
defaults
    option  httplog
    option  dontlognull
    timeout connect 5s
    timeout client 50s
    timeout server 20s
listen http
    bind :80
    timeout client 1h
    tcp-request inspect-delay 2s
    acl is_http req_proto_http
    tcp-request content accept if is_http
    server server-http :8080
backend ssh
    mode tcp
    timeout server 1h
    server server-ssh :22

意思是,绑定80端口,如果收到tcp连接请求,则延时2秒用于判断,如果是http协议,则转发到8080端口(webserver),否则,转发到22端口。

一、问题

这样配置后,基本问题不大,我们可以用过浏览器直接访问网址,也可以通过bitvise或者xshell指定80端口进行ssh连接。

但是,当我们使用linux进行连接时,会报错!刚开始连接的语句为:

ssh xxx@xxxxx 80

错误如下:

QQ图片20160128191859


它并没有把80自动识别为端口,而是默认连接22端口,于是我加了-p指定端口,如下:

ssh xxx@xxxxx -p 80

QQ图片20160128192113

这个时候,我们简单地看到ssh_exchange_identification错误,于是我搜索了一下,发现被告知是最大连接数或者是白名单黑名单的问题,于是我查了一遍最大连接数,/etc/hosts.allow ,/etc/hosts.deny,均没有发现特别的设置。

于是,继续使用-v打印详细的ssh连接信息:

QQ图片20160128192519


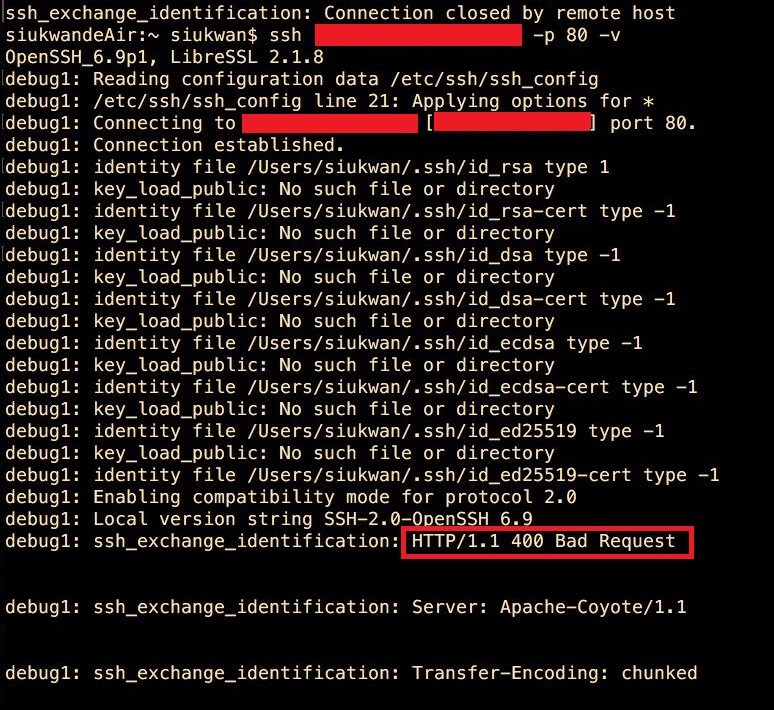
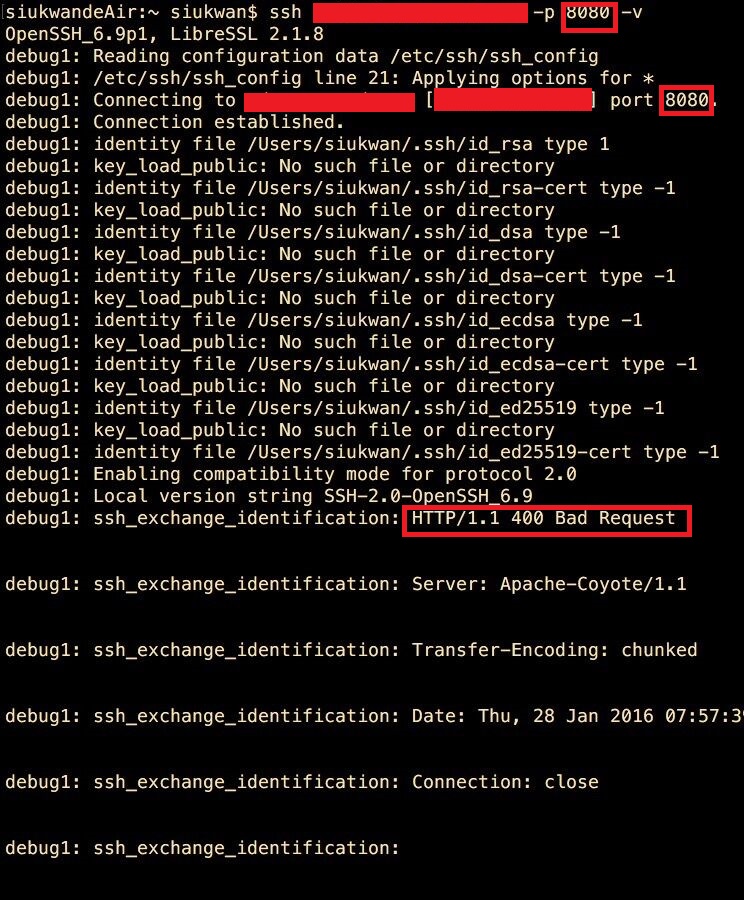
我们发现ssh连接会有Bad Request,这个明显是webserver的400回复啊,为了进一步确认,我在局域网内(局域网开放了8080端口,外网只开放80端口)ssh8080端口,结果和上面一样,如下图:

QQ图片20160128192446


这个时候可以确认问题所在了,就是使用linux终端直接ssh的时候,haproxy还是直接转发到了8080端口,意思是我们的转发规则并没有写好。

二、测试与改进haproxy规则

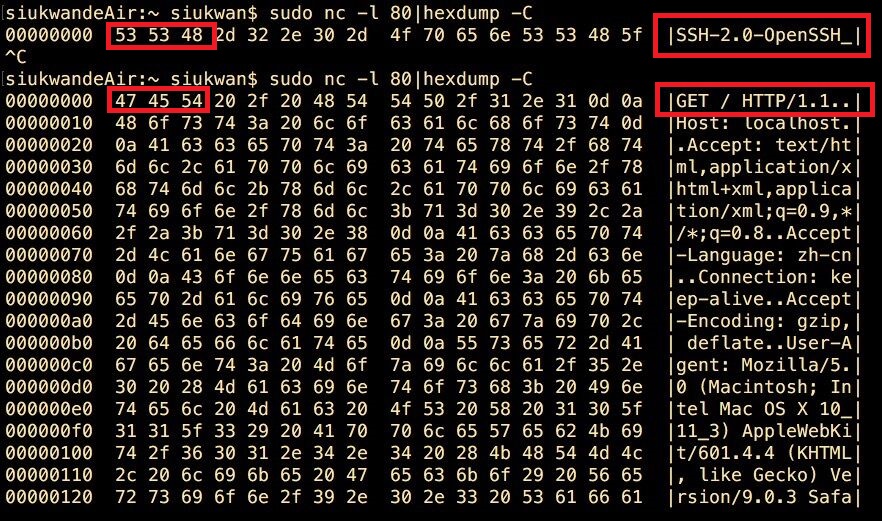
使用nc命令查看payload,利用payload来进行判断,从而进行转发,命令如下:

nc -l 8888|hexdump -C

我们先随便绑定一个8888端口,然后hexdump输出16进制信息,看看ssh与http请求有什么不一样的地方。输入上述命令后,会开始监听8888端口,于是我们可以对8888端口发送ssh和http请求:

ssh:直接在终端上面输入ssh localhost -p 8888即可

http:打开浏览器,输入网址localhost:8888

然后我们会有如下的结果:

QQ图片20160128193549


于是,我们可以对haproxy的转发规则进行修改,如下:

#By http://blog.creke.net/
global
    maxconn 5120
    chroot /usr/share/haproxy
    daemon
    quiet
    nbproc 2
    pidfile /usr/share/haproxy/haproxy.pid
defaults
    option  httplog
    option  dontlognull
    timeout connect 5s
    timeout client 50s
    timeout server 20s
listen http
    bind :80
    timeout client 1h
    tcp-request inspect-delay 2s

    #2016.1.28 siukwan改                 G E T  P O S  P U T  D E L  etc
    acl is_http req.payload(0,3) -m bin 474554 504f53 505554 44454c
    #                                   S S H    
    acl is_ssh req.payload(0,3) -m bin 535348

    tcp-request content accept if is_http
    server server-http :8080
backend ssh
    mode tcp
    timeout server 1h
    server server-ssh :22

最后需要kill haproxy进程,然后使用如下命令启动:

/usr/sbin/haproxy -f /etc/haproxy/haproxy.cfg

使用终端直接指定80端口进行ssh连接,能够成功连接上!

Haproxy配置文件详解

(转)写在前面的话,《Haproxy配置文件详解》文档部分信息来自网络,同时参考过官方的架构指南,在此非常感谢zero提供的文档,以及在学习Haproxy过程中的帮助。

#/usr/local/sbin/haproxy -f /etc/haproxy/haproxy.cfg -st `cat /var/run/haproxy.pid` 
       ####################全局配置信息######################## 
       #######参数是进程级的,通常和操作系统(OS)相关######### 
global 
       maxconn 20480                   #默认最大连接数 
       log 127.0.0.1 local3            #[err warning info debug] 
       chroot /var/haproxy             #chroot运行的路径 
       uid 99                          #所属运行的用户uid 
       gid 99                          #所属运行的用户组 
       daemon                          #以后台形式运行haproxy 
       nbproc 1                        #进程数量(可以设置多个进程提高性能) 
       pidfile /var/run/haproxy.pid    #haproxy的pid存放路径,启动进程的用户必须有权限访问此文件 
       ulimit-n 65535                  #ulimit的数量限制 
 
 
       #####################默认的全局设置###################### 
       ##这些参数可以被利用配置到frontend,backend,listen组件## 
defaults 
       log global 
       mode http                       #所处理的类别 (#7层 http;4层tcp  ) 
       maxconn 20480                   #最大连接数 
       option httplog                  #日志类别http日志格式 
       option httpclose                #每次请求完毕后主动关闭http通道 
       option dontlognull              #不记录健康检查的日志信息 
       option forwardfor               #如果后端服务器需要获得客户端真实ip需要配置的参数,可以从Http Header中获得客户端ip  
       option redispatch               #serverId对应的服务器挂掉后,强制定向到其他健康的服务器  
       option abortonclose             #当服务器负载很高的时候,自动结束掉当前队列处理比较久的连接 
       stats refresh 30                #统计页面刷新间隔 
       retries 3                       #3次连接失败就认为服务不可用,也可以通过后面设置 
       balance roundrobin              #默认的负载均衡的方式,轮询方式 
      #balance source                  #默认的负载均衡的方式,类似nginx的ip_hash 
      #balance leastconn               #默认的负载均衡的方式,最小连接 
       contimeout 5000                 #连接超时 
       clitimeout 50000                #客户端超时 
       srvtimeout 50000                #服务器超时 
       timeout check 2000              #心跳检测超时 
 
       ####################监控页面的设置####################### 
listen admin_status                    #Frontend和Backend的组合体,监控组的名称,按需自定义名称 
        bind 0.0.0.0:65532             #监听端口 
        mode http                      #http的7层模式 
        log 127.0.0.1 local3 err       #错误日志记录 
        stats refresh 5s               #每隔5秒自动刷新监控页面 
        stats uri /admin?stats         #监控页面的url 
        stats realm itnihao\ itnihao   #监控页面的提示信息 
        stats auth admin:admin         #监控页面的用户和密码admin,可以设置多个用户名 
        stats auth admin1:admin1       #监控页面的用户和密码admin1 
        stats hide-version             #隐藏统计页面上的HAproxy版本信息  
        stats admin if TRUE            #手工启用/禁用,后端服务器(haproxy-1.4.9以后版本) 
 
 
       errorfile 403 /etc/haproxy/errorfiles/403.http 
       errorfile 500 /etc/haproxy/errorfiles/500.http 
       errorfile 502 /etc/haproxy/errorfiles/502.http 
       errorfile 503 /etc/haproxy/errorfiles/503.http 
       errorfile 504 /etc/haproxy/errorfiles/504.http 
 
       #################HAProxy的日志记录内容设置################### 
       capture request  header Host           len 40 
       capture request  header Content-Length len 10 
       capture request  header Referer        len 200 
       capture response header Server         len 40 
       capture response header Content-Length len 10 
       capture response header Cache-Control  len 8 
     
       #######################网站监测listen配置##################### 
       ###########此用法主要是监控haproxy后端服务器的监控状态############ 
listen site_status 
       bind 0.0.0.0:1081                    #监听端口 
       mode http                            #http的7层模式 
       log 127.0.0.1 local3 err             #[err warning info debug] 
       monitor-uri /site_status             #网站健康检测URL,用来检测HAProxy管理的网站是否可以用,正常返回200,不正常返回503 
       acl site_dead nbsrv(server_web) lt 2 #定义网站down时的策略当挂在负载均衡上的指定backend的中有效机器数小于1台时返回true 
       acl site_dead nbsrv(server_blog) lt 2 
       acl site_dead nbsrv(server_bbs)  lt 2  
       monitor fail if site_dead            #当满足策略的时候返回503,网上文档说的是500,实际测试为503 
       monitor-net 192.168.16.2/32          #来自192.168.16.2的日志信息不会被记录和转发 
       monitor-net 192.168.16.3/32 
 
       ########frontend配置############ 
       #####注意,frontend配置里面可以定义多个acl进行匹配操作######## 
frontend http_80_in 
       bind 0.0.0.0:80      #监听端口,即haproxy提供web服务的端口,和lvs的vip端口类似 
       mode http            #http的7层模式 
       log global           #应用全局的日志配置 
       option httplog       #启用http的log 
       option httpclose     #每次请求完毕后主动关闭http通道,HA-Proxy不支持keep-alive模式 
       option forwardfor    #如果后端服务器需要获得客户端的真实IP需要配置次参数,将可以从Http Header中获得客户端IP 
       ########acl策略配置############# 
       acl itnihao_web hdr_reg(host) -i ^(www.itnihao.cn|ww1.itnihao.cn)$    
       #如果请求的域名满足正则表达式中的2个域名返回true -i是忽略大小写 
       acl itnihao_blog hdr_dom(host) -i blog.itnihao.cn 
       #如果请求的域名满足www.itnihao.cn返回true -i是忽略大小写 
       #acl itnihao    hdr(host) -i itnihao.cn 
       #如果请求的域名满足itnihao.cn返回true -i是忽略大小写 
       #acl file_req url_sub -i  killall= 
       #在请求url中包含killall=,则此控制策略返回true,否则为false 
       #acl dir_req url_dir -i allow 
       #在请求url中存在allow作为部分地址路径,则此控制策略返回true,否则返回false 
       #acl missing_cl hdr_cnt(Content-length) eq 0 
       #当请求的header中Content-length等于0时返回true 
 
       ########acl策略匹配相应############# 
       #block if missing_cl 
       #当请求中header中Content-length等于0阻止请求返回403 
       #block if !file_req || dir_req 
       #block表示阻止请求,返回403错误,当前表示如果不满足策略file_req,或者满足策略dir_req,则阻止请求 
       use_backend  server_web  if itnihao_web 
       #当满足itnihao_web的策略时使用server_web的backend 
       use_backend  server_blog if itnihao_blog 
       #当满足itnihao_blog的策略时使用server_blog的backend 
       #redirect prefix http://blog.itniaho.cn code 301 if itnihao 
       #当访问itnihao.cn的时候,用http的301挑转到http://192.168.16.3 
       default_backend server_bbs 
       #以上都不满足的时候使用默认server_bbs的backend 


       ##########backend的设置############## 
       #下面我将设置三组服务器 server_web,server_blog,server_bbs
###########################backend server_web############################# 
backend server_web 
       mode http            #http的7层模式 
       balance roundrobin   #负载均衡的方式,roundrobin平均方式 
       cookie SERVERID      #允许插入serverid到cookie中,serverid后面可以定义 
       option httpchk GET /index.html #心跳检测的文件 
       server web1 192.168.16.2:80 cookie web1 check inter 1500 rise 3 fall 3 weight 1  
       #服务器定义,cookie 1表示serverid为web1,check inter 1500是检测心跳频率rise 3是3次正确认为服务器可用, 
       #fall 3是3次失败认为服务器不可用,weight代表权重 
       server web2 192.168.16.3:80 cookie web2 check inter 1500 rise 3 fall 3 weight 2 
       #服务器定义,cookie 1表示serverid为web2,check inter 1500是检测心跳频率rise 3是3次正确认为服务器可用, 
       #fall 3是3次失败认为服务器不可用,weight代表权重 
 
###################################backend server_blog############################################### 
backend server_blog 
       mode http            #http的7层模式 
       balance roundrobin   #负载均衡的方式,roundrobin平均方式 
       cookie SERVERID      #允许插入serverid到cookie中,serverid后面可以定义 
       option httpchk GET /index.html #心跳检测的文件 
       server blog1 192.168.16.2:80 cookie blog1 check inter 1500 rise 3 fall 3 weight 1  
       #服务器定义,cookie 1表示serverid为web1,check inter 1500是检测心跳频率rise 3是3次正确认为服务器可用,fall 3是3次失败认为服务器不可用,weight代表权重 
       server blog2 192.168.16.3:80 cookie blog2 check inter 1500 rise 3 fall 3 weight 2 
        #服务器定义,cookie 1表示serverid为web2,check inter 1500是检测心跳频率rise 3是3次正确认为服务器可用,fall 3是3次失败认为服务器不可用,weight代表权重 
 
###################################backend server_bbs############################################### 
 
backend server_bbs 
       mode http            #http的7层模式 
       balance roundrobin   #负载均衡的方式,roundrobin平均方式 
       cookie SERVERID      #允许插入serverid到cookie中,serverid后面可以定义 
       option httpchk GET /index.html #心跳检测的文件 
       server bbs1 192.168.16.2:80 cookie bbs1 check inter 1500 rise 3 fall 3 weight 1  
       #服务器定义,cookie 1表示serverid为web1,check inter 1500是检测心跳频率rise 3是3次正确认为服务器可用,fall 3是3次失败认为服务器不可用,weight代表权重 
       server bbs2 192.168.16.3:80 cookie bbs2 check inter 1500 rise 3 fall 3 weight 2 
        #服务器定义,cookie 1表示serverid为web2,check inter 1500是检测心跳频率rise 3是3次正确认为服务器可用,fall 3是3次失败认为服务器不可用,weight代表权重 

shell实战:子shell与后台运行

这段时间在运行仿真程序ns3,由于ns3是单线程,而我编写了三个路由算法进行对比,电脑CPU是八线程,于是在考虑能不能写一个脚本,同时运行三个程序,这样可以提高工作效率。(每个程序视数据量大小运行时间不等,但是普遍需要运行半个小时以上。)

于是,我开始研究shell脚本的编写。

首先梳理一下shell脚本需要实现什么功能:

1.创建一个以当前时间命名的文件夹,用于存放实验结果;

2.同时运行三个路由算法(即三个程序);

3.整理三个结果并上传到github。

一、以当前时间命名文件夹(子shell)

我们知道date命令可以获取当前系统时间,那么我们如何把date命令得到的结果重定向输出到shell变量中呢?

在shell中,()表示开启一个子shell,于是我利用子shell把date的输出赋值到shell的变量中,语句如下:

git_date=$(date)

git_date为shell中的变量,$(date)把date输出的结果复制给git_date。

二、同时运行三个程序

在shell中,同时运行多个程序,那么需要把部分程序放到后台中运行,这个时候,我们需要使用&符号,在执行程序的语句后面加上&,即可把程序放置后台运行(但是标准输出仍然显示在终端中),语句如下:

#后台运行ndn
./waf --run "nrndn_test --method=0" > ~/ndc-ns3-result/$file_name/ndn_record.txt &
#后台运行dis
sleep 4
./waf --run "nrndn_test --method=1" > ~/ndc-ns3-result/$file_name/dis_record.txt &
#后台运行cds
sleep 4
./waf --run "nrndn_test --method=2" > ~/ndc-ns3-result/$file_name/cds_record.txt &

我同时运行了三个程序,并且重定向输出到文件中。

其中,需要注意的是,我们需要监控后台运行的程序什么时候结束,这个时候需要使用wait命令,和unix中的多线程编程的waitpid类似。wait之后,在执行一些结果整理的命令。

三、整理并上传github

最后一步显得比较简单,使用cat命令合并一些实验结果,然后使用git命令上传到github。


下面为整个go.sh文件:

#!/bin/bash
#先去更新ndc-ns3-result文件夹
cd ~/ndc-ns3-result
git pull

#定义时间变量
git_date=$(date)
shell_date=$(date +%Y%m%d-%k%M%S)
file_name="result-"$shell_date

#输出shell_data
echo $file_name

mkdir ~/ndc-ns3-result/$file_name

cd ~/ndn/ns-3/
#先进行编译
./waf --run "nrndn_test --method=3"

#后台运行ndn
./waf --run "nrndn_test --method=0" > ~/ndc-ns3-result/$file_name/ndn_record.txt &
#后台运行dis
sleep 4
./waf --run "nrndn_test --method=1" > ~/ndc-ns3-result/$file_name/dis_record.txt &
#后台运行cds
sleep 4
./waf --run "nrndn_test --method=2" > ~/ndc-ns3-result/$file_name/cds_record.txt &

#等待后台程序结束
wait

#把结果合并输出到result.txt
cat ~/input/NR-NDN-Simulation/result.txt ~/input/CDS-Simulation/result.txt  ~/input/CDS-Simulation/result.txt > ~/ndc-ns3-result/$file_name/result.txt


cd ~/ndc-ns3-result
git add $file_name/ndn_record.txt
git add $file_name/dis_record.txt
git add $file_name/cds_record.txt
git add $file_name/result.txt

git commit -m "$git_date"
git push

#输出开始和结束时间
echo "开始时间:"$git_date
end_date=$(date)
echo "结束时间:"$end_date 
exit


328. Odd Even Linked List(easy)

1.题目要求把奇数节点放到前面,偶数节点放在后面,较为简单。注意链表为空,只有一个节点的特殊情况。

Given a singly linked list, group all odd nodes together followed by the even nodes. Please note here we are talking about the node number and not the value in the nodes.

You should try to do it in place. The program should run in O(1) space complexity and O(nodes) time complexity.

Example:
Given 1->2->3->4->5->NULL,
return 1->3->5->2->4->NULL.

Note:
The relative order inside both the even and odd groups should remain as it was in the input.
The first node is considered odd, the second node even and so on …

AC代码:

/**
 * Definition for singly-linked list.
 * struct ListNode {
 *     int val;
 *     ListNode *next;
 *     ListNode(int x) : val(x), next(NULL) {}
 * };
 */
class Solution {
public:
    ListNode* oddEvenList(ListNode* head) {
        if(head == NULL) return head;
        else if(head->next==NULL) return head;
        else
        {
            ListNode* odd =head;
            ListNode* even=head->next;
            ListNode* a=odd;
            ListNode* b=even;
            head=head->next;
            head=head->next;
            while(head!=NULL)
            {
                a->next=head;
                a=a->next;
                head=head->next;
                if(head!=NULL)
                {//如果下一个节点不为空
                    b->next=head;
                    b=b->next;
                    head=head->next;
                }
                else
                {//如果为空
                    b->next=NULL;
                    break;
                }
            }
            a->next=even;
            b->next=NULL;
            return odd;
        }
        
    }
};


326. Power of Three(easy)

1.题目要求判断一个数是否为3的k次幂,如果是则输出true,否则输出false

2.我们可以使用简单的递归进行判断,时间复杂度为O(logn),其中log的底数为3。代码如下:

class Solution {
public:
	bool isPowerOfThree(int n) {
		
		if (n < 3)
		{
			if (n == 1) return true;
			else return false;
		}
		else
		{
			if (n % 3 == 0)
				return isPowerOfThree(n / 3);
			else return false;
		}
	}
};

3.其中,题目额外提示,能不能使用非递归和非循环的方法实现。

我们来分析一下题目,题目中要求判断的数的类型为int,即最大为2^31-1,而3^k次方中,k会比31小,所以答案个数是非常有限的,我们把所有的列出来,如下:

1,3,9,27,81,243,729,2187,6561,19683,59049,177147,531441,1594323,4782969,14348907,43046721,129140163,387420489,1162261467

答案一共只有20个,我们可以直接判断n是否等于上面20个数中的某一个即可。

另外,再深入分析,我们可以看到,上述所有数都可以整除1162261467,1162261467是int类型中3的最大幂次方,它的质因数只有3,而其他小于1162261467的3的幂次方的质因数也只有3,如果包含了其他质因数,则这个数肯定不是3的幂次方。于是我们有了更简单的判断方法,判断n是否能被1162261467整除即可,代码如下:

class Solution {
public:
	bool isPowerOfThree(int n) {
		return n>0 ? !(1162261467 % n) : 0;
	}
};


Given an integer, write a function to determine if it is a power of three.

Follow up:
Could you do it without using any loop / recursion?


linux cron实战:定时github

相关文章:GitHub第一步:生成ssh keys

最近由于需要使用实验室的一台高性能工作站来跑程序,ssh进行远程登录,但是有时候电脑重启后,ip发生变化,于是在思考用什么办法来存储这台电脑的ip地址。

刚开始的想法是把ip地址直接上传到这个博客,定时更新。后来想想,既然是自己自定义cron任务,能不能上传到github呢?这样就不用浪费博客的流量了,也是进行了下面的实验:

一、编写shell脚本

首先是确定我要如何更新,更新一些什么信息:

最简单的是,需要更新ip和时间,于是我写了个sh脚本,使用date和ifconfig来获取时间和ip信息,最后将两个文件合并,如下:

#use the 'date' command to get the date, and output to the 'tmp1' file
#使用date命令获取时间,并重点向输出到文件tmp1
date > tmp1

#use the 'ifconfig' command to get ip information(just get the ip address include '172',such as 172.168.12.12), and outpt to the 'tmp2' file
#使用ifconfig获取172字段的信息,因为局域网的字段为172开头,避免泄漏不必要的信息,只grep了这部分,同样重定向输出到tmp2
ifconfig | grep 172 > tmp2

#use the 'cat' command to merger 2 files
#使用cat 命令合并两个文件
cat tmp1 tmp2 > result

其中,我们的局域网网段是172开头的,所以直接grep 172。

接着,我尝试在sh脚本里面加上git的操作,整个cron.sh脚本如下:

#!/bin/bash

#open the directory
#打开cron目录
cd ~/cron

#to avoid the new version changed by other users,git pull first
#避免其他用户更新了目录,先进行git pull到endIdx
git pull

#open the directory again
#再次打开目录
cd ~/cron

#use the 'date' command to get the date, and output to the 'tmp1' file
#使用date命令获取时间,并重点向输出到文件tmp1
date > tmp1

#use the 'ifconfig' command to get ip information(just get the ip address include '172',such as 172.168.12.12), and outpt to the 'tmp2' file
#使用ifconfig获取172字段的信息,因为局域网的字段为172开头,避免泄漏不必要的信息,只grep了这部分,同样重定向输出到tmp2
ifconfig | grep 172 > tmp2

#use the 'cat' command to merger 2 files
#使用cat 命令合并两个文件
cat tmp1 tmp2 > result

#add cron.sh and the result file to the git cache
#把cron.sh和result文件添加到git缓冲区
git add cron.sh
git add result

#git commit the change
#提交更改
git commit -m "refresh"

#push to the github
#最后,上传到github
git push

把cron.sh的权限更改为可执行:

chmod +x cron.sh

然后运行:

./cron.sh

发现能够正常工作。

二、添加cron任务

首先我们可以通过

crontab -l

列出当前的crontab文件内容,即看看是否有cron任务。

接着,我们通过:

crontab -e

命令编辑crontab 文件,添加以下内容:

# crontab -l #list the cron jobs
# crontab -e #to edit the cron
# add these text to the crontab,then save and quit
# it will run cron.sh every 15 minutes
# :wq
# it will be better to restart cron service
# ubuntu:  sudo /etc/init.d/cron restart
# centos:  sudo /sbin/service crond restart

SHELL=/bin/bash
PATH=/sbin:/bin:/usr/sbin:/usr/bin
MAILTO=root

# For details see man 4 crontabs

# Example of job definition:
# .---------------- minute (0 - 59)
# |  .------------- hour (0 - 23)
# |  |  .---------- day of month (1 - 31)
# |  |  |  .------- month (1 - 12) OR jan,feb,mar,apr ...
# |  |  |  |  .---- day of week (0 - 6) (Sunday=0 or 7) OR sun,mon,tue,wed,thu,fri,sat
# |  |  |  |  |
# *  *  *  *  * user-name  command to be executed
*/15 *  *  *  *  /bin/bash ~/cron/cron.sh

其中,关键在于最后一行:

*/15 *  *  *  *  /bin/bash ~/cron/cron.sh

意思是每15分钟执行一次~/cron/cron.sh

保存退出后,为了保险起见,最好重启一下cron服务:

# ubuntu:  
sudo /etc/init.d/cron restart
# centos:  
sudo /sbin/service crond restart

注意ubuntu和centos的命令有些许不同,至此,我们的自动github更新ip程序完成!

通过这个程序,我们还可以定时github其他的信息,既能延长github的最长contributions时间,又可以免费使用github的服务器帮我们存储信息。

项目网址:

https://github.com/siukwan/cron

在日夜运行的实验室服务器ndcRobot:

https://github.com/ndcRobot/cron

cmake项目工程中的头文件与库连接

1.当项目变得庞大时,我们需要划分头文件和功能模块的cpp文件。

2.例如在unp编程中,我把第六章的模块划分为如下:(项目源码网址为:https://github.com/siukwan/unix

模块


其中func_err.cpp和func_wrap.cpp包含了常用的函数,这些函数在下面的tcpcli.cpp和tcpserv.cpp等文件中需要使用,这两个文件均#include”func.h”

而tcpcli.cpp和tcpserv.cpp也包含了#include”func.h”。那么tcpcli.cpp和tcpserv.cpp如何能够调用func_err.cpp和func_wrap.cpp里面的函数呢?

首先,因为均包含了公共头文件func.h,所以我们需要在func.h中extern一些常用的函数,如下:

extern


这些函数的定义在func_err.cpp和func_wrap.cpp里面,extern只是告诉编译器,编译的时候需要从其他文件中搜索这些函数的定义。

但是tcpcli.cpp和tcpserv.cpp没有直接包含func_err.cpp和func_wrap.cpp,编译的时候找不到这些函数怎么办?

接下来就是需要使用到库和连接了,以下以tcpcli.cpp和func_err.cpp举例。tcpcli.cpp虽然没有定义func_err中的函数,但是因为包含了func.h头文件,这些函数被声明了,这是,我们不能把tcpcli.cpp编译成执行文件,但是可以先把tcpcli.cpp和func_err.cpp编程成.o文件,然后把这两个.o文件连接起来生成执行文件。

CMakeList中的写法如下:

#设置错误函数和包裹函数
SET(LIB_FUNC_ERR_SRC func_err.cpp)
SET(LIB_FUNC_WRAP_SRC func_wrap.cpp)

#设置服务器编译文件
SET(SERVER_SRC_LIST tcpserv.cpp)

#连接库
ADD_LIBRARY(FuncErr STATIC ${LIB_FUNC_ERR_SRC} )
ADD_LIBRARY(FuncWrap STATIC ${LIB_FUNC_WRAP_SRC} )

#输出可执行文件
ADD_EXECUTABLE(server ${SERVER_SRC_LIST})
TARGET_LINK_LIBRARIES(server FuncErr FuncWrap)

MacOS终端中使用cmake

由于最近在mac上面编写c++程序,使用了终端、vim和cmake。

下面是安装cmake的一些记录。

首先,我们需要安装homebrew,可以通过下面的命令进行安装:

ruby -e "$(curl -fsSL https://raw.githubusercontent.com/Homebrew/install/master/install)"

中间需要使用到超级用户,按照提示输入密码即可。

然后可以继续通过下面的命令安装cmake:

brew install make

我先前是下载了cmake的gui版本,但是可惜gui版本不能在终端中运行,于是按照上述方法安装了终端版本的cmake。

brew是一个安装辅助软件,类似ubuntu里面的apt-get和centos里面的yum,能够通过它下载很多软件,例如opencv等等。