在CUDA的GPU编程里面,函数分为三类,前缀分别为__global__、__host__、__device__。
(1)__host__
如果没有标明前缀,那么函数默认为__host__,可以理解为CPU函数,这些函数不能被global和device函数所调用。
(2)__global__
前缀注明__global__,则这个函数可以被GPU调用,并且这个函数可以调用__device__前缀的函数。
(3)__device__
__device__表明这个函数是在GPU里面运行的。
在CUDA的GPU编程里面,函数分为三类,前缀分别为__global__、__host__、__device__。
(1)__host__
如果没有标明前缀,那么函数默认为__host__,可以理解为CPU函数,这些函数不能被global和device函数所调用。
(2)__global__
前缀注明__global__,则这个函数可以被GPU调用,并且这个函数可以调用__device__前缀的函数。
(3)__device__
__device__表明这个函数是在GPU里面运行的。
最近在使用cuda平台进行一些多线程的编程,其中涉及到把数据从内存复制到显存,然后从显存复制到内存的操作。其中复制操作有很重要的一点是,假如是复制数组,内存空间必须是连续的。其中一维数组本身是连续的,所以没有问题。但是对于二维数组和三维数组等等,需要一开始就要分配好空间,不能使用new或者malloc来动态分配,否则会出现复制后没有效果,或者其他意想不到的后果。
我刚开始是用动态创建数组的,即new,结果运行程序后,发现cpu_graph没有改变,后来把定义改为确定大小的数组后,才能复制成功。
整个工作流程大概是:
[c language=”++”]
GraphAll *gpu_graph;
//在gpu上分配内存
cudaMalloc((void **)&gpu_graph, sizeof(cpu_graph));
//把数据从内存复制到显存
cudaMemcpy(gpu_graph, &cpu_graph, sizeof(cpu_graph), cudaMemcpyHostToDevice);
//进行数据处理
SiukwanTest(gpu_graph);
//把在gpu中处理完毕的数据从显存复制到内存
cudaMemcpy(&cpu_graph, gpu_graph, sizeof(cpu_graph), cudaMemcpyDeviceToHost);
//释放显存
cudaFree(gpu_graph);
[/c]
刚开始的GraphAll变量定义如下,基本采用了指针,进行动态分配:
[c language=”++”]
struct GraphNode
{
char **shape;
int x ;
int y ;
};
//记录每种图形的变形,原始,旋转,翻转,不除去重复的,共有8种
struct GraphFormat
{
GraphNode *format;
int formatCount;
};
//存储所有图形
struct GraphAll
{
GraphFormat *graph;
int graphCount;
}cpu_graph;//cpu图形定义为全局变量
[/c]
由于进行动态分配,地址空间不连续,导致复制失败。后面我把变量改成确定大小的数组,如下,然后同样的程序,复制成功了:
[c language=”++”]
struct GraphNode
{
char shape[5][5];
int x ;
int y ;
};
//记录每种图形的变形,原始,旋转,翻转,不除去重复的,共有8种
struct GraphFormat
{
GraphNode format[8];
int formatCount;
};
//存储所有图形
struct GraphAll
{
GraphFormat graph[12];
int graphCount;
}cpu_graph;//cpu图形定义为全局变量
[/c]
最近需要写一个回溯的程序,因为最终要提交windows的exe文件,但是测试的时候windows上运行太慢,于是在linux上测试数据。所以导致这个程序需要兼容linux和windows。
我先是通过下面的宏判断来区分windows代码和linux代码:
#ifdef WIN32
#else
#endif
下面再介绍一些windows和linux的多线程编程:
一、windows
windows下面的多线程编程需要用到的函数是
HANDLE hThread = CreateThread(NULL, 0, dfsThread, NULL, 0, NULL);
其中dfsThread是我定义的函数。如果需要加上互斥量,可以通过下面的语句添加:
[c language=”++”]
#include <windows.h>
#include <tchar.h>
HANDLE GraphIdxMutex = CreateMutex(NULL, FALSE, _T("GraphIdx"));
WaitForSingleObject(GraphIdxMutex, INFINITE);//加锁或等待其他线程释放锁
//进行操作
ReleaseMutex(GraphIdxMutex);//释放锁
[/c]
注意CreateMutex函数的第三个参数,它需要LPCWSTR类型,我们可以添加头文件tchar.h,利用_T(“string”)把string(或const char)转化为LPCWSTR。
二、linux
在linux上面,pthread的用法和windows上面的用法十分相似,需要包含<pthread.h>创建线程的函数为:
pthread_create(&tid, NULL, dfsThread, NULL);
其中需要把dfsThread定义为函数指针,例如void *dfsThread()。
另外,因为pthread不在系统库中,所以编译的时候需要指明使用pthread库,编译语句如下:
[shell]
g++ main.cpp -lpthread -std=c++11
[/shell]
互斥量如下:
[c language=”++”]
pthread_mutex_t GraphIdxMutex;
pthread_mutex_init(&GraphIdxMutex, NULL);//需要初始化
pthread_mutex_lock(&GraphIdxMutex); // 给互斥体变量加锁
//进行操作
pthread_mutex_unlock(&GraphIdxMutex); // 给互斥体变量解除锁
[/c]
下面是dfsThread函数体的定义以及实际创建线程,实现一样的功能:
[c language=”++”]
#ifdef WIN32
//windows多线程
int PrintfThreshold = 1000;
//创建互斥变量
HANDLE RunningThreadSumMutex = CreateMutex(NULL, FALSE, _T("RunningThreadSum"));
HANDLE GraphIdxMutex = CreateMutex(NULL, FALSE, _T("GraphIdx"));
DWORD WINAPI dfsThread(LPVOID lpParamter)
{
//互斥访问GraphIdx,并复制当前的GraphIdx,避免后面出现被其他线程更改的情况
WaitForSingleObject(GraphIdxMutex, INFINITE);
int tmpIdx = GraphIdx;
GraphIdx++;
ReleaseMutex(GraphIdxMutex);
printf("\n|—————————————————————|\n");
printf( "| 开启%02d线程 |\n", tmpIdx);
printf( "|—————————————————————|\n\n");
//进行深度搜索
dfs(0, ThreadUsed[tmpIdx], ThreadMat[tmpIdx], ThreadAnswer[tmpIdx], tmpIdx, ThreadCounter[tmpIdx]);
//线程工作完成
WaitForSingleObject(RunningThreadSumMutex, INFINITE);
RunningThreadSum–;
ReleaseMutex(RunningThreadSumMutex);
ThreadFinished[tmpIdx] = true;
printf("\n|—————————————————————|\n");
printf( "|XXXXXXXXXXXXXXXXXXXXXX 结束%02d线程 XXXXXXXXXXXXXXXXXXXXXXX|\n", tmpIdx);
printf( "|—————————————————————|\n\n");
return 1;
}
#else
int PrintfThreshold = 1000000;
//创建互斥变量
pthread_mutex_t RunningThreadSumMutex;
pthread_mutex_t GraphIdxMutex;
void *dfsThread(void *arg)
{
//互斥访问GraphIdx,并复制当前的GraphIdx,避免后面出现被其他线程更改的情况
pthread_mutex_lock(&GraphIdxMutex); // 给互斥体变量加锁
int tmpIdx = GraphIdx;
GraphIdx++;
pthread_mutex_unlock(&GraphIdxMutex); // 给互斥体变量解除锁
printf("\n|—————————————————————|\n");
printf( "| 开启%02d线程 |\n", tmpIdx);
printf( "|—————————————————————|\n\n");
//进行深度搜索
dfs(0, ThreadUsed[tmpIdx], ThreadMat[tmpIdx], ThreadAnswer[tmpIdx], tmpIdx, ThreadCounter[tmpIdx]);
//线程工作完成
pthread_mutex_lock(&RunningThreadSumMutex); // 给互斥体变量加锁
RunningThreadSum–;
pthread_mutex_unlock(&RunningThreadSumMutex); // 给互斥体变量解除锁
ThreadFinished[tmpIdx] = true;
printf("\n|—————————————————————|\n");
printf("|XXXXXXXXXXXXXXXXXXXXXX 结束%02d线程 XXXXXXXXXXXXXXXXXXXXXXX|\n", tmpIdx);
printf("|—————————————————————|\n\n");
}
#endif
//实际调用:
while (openThreadCount<12)
{//开启12条线程
if (RunningThreadSum < CPU_THREAD_COUNT)
{//开启12条线程,如果能够开线程
#ifdef WIN32
WaitForSingleObject(RunningThreadSumMutex, INFINITE);
RunningThreadSum++;
openThreadCount++;
ReleaseMutex(RunningThreadSumMutex);
//开线程:
HANDLE hThread = CreateThread(NULL, 0, dfsThread, NULL, 0, NULL);
Sleep(1);
#else
pthread_mutex_lock(&RunningThreadSumMutex); // 给互斥体变量加锁
RunningThreadSum++;
openThreadCount++;
pthread_mutex_unlock(&RunningThreadSumMutex); // 给互斥体变量解除锁
//开线程:
pthread_t tid;
pthread_create(&tid, NULL, dfsThread, NULL);
usleep(1);
#endif
}
else//不能开线程
while (RunningThreadSum >= CPU_THREAD_COUNT);
}
[/c]
在centOS系统中,可以通过nmap来检测端口、ip使用情况。
Nmap是一款网络扫描和主机检测的非常有用的工具。Nmap是不局限于仅仅收集信息和枚举,同时可以用来作为一个漏洞探测器或安全扫描器。它可以适用于winodws,linux,mac等操作系统
Nmap是一款非常强大的实用工具,可用于:检测活在网络上的主机(主机发现)检测主机上开放的端口(端口发现或枚举)检测到相应的端口(服务发现)的软件和版本检测操作系统,硬件地址,以及软件版本检测脆弱性的漏洞(Nmap的脚本)Nmap是一个非常普遍的工具,它有命令行界面和图形用户界面。
1.先使用sudo yum install nmap命令进行安装。
2.使用nmap
[shell]
nmap 192.168.1.1-100 #扫描IP地址为192.168.1.1-192.168.1.100内的所有主机
nmap localhost #查看主机当前开放的端口
nmap -p 1024-65535 localhost #查看主机端口(1024-65535)中开放的端口
nmap -PS 192.168.21.163 #探测目标主机开放的端口
nmap -PS22,80,3306 192.168.21.163 #探测所列出的目标主机端口
nmap -O 192.168.21.163 #探测目标主机操作系统类型
nmap -A 192.168.21.163 #探测目标主机操作系统类型
nmap –help #更多nmap参数请查询帮助信息
[/shell]
3.关闭或打开主机端口
[shell]
nmap localhost #查看主机当前开放端口
ntsysv #打开系统服务器管理器(需要先安装yum install ntsysv),选择要关闭或者打开的服务
[/shell]
[shell]
warning: push.default is unset; its implicit value is changing in Git 2.0 from ‘matching’ to ‘simple’.
To squelch this message and maintain the current behavior after the default changes, use: git config –global push.default matching
To squelch this message and adopt the new behavior now, use: git config –global push.default simple
[/shell]
出现这个提示,但是实际上,git还是会提交。
可以按照上述指令运行:git config –global push.default matching或者git config –global push.default simple命令,以后再push就不会有警告。
下面说一下push.default matching和push.default simple的区别:
push.default设置maching的意思是:git push 会把你本地所有分支push到名称相对应的远程主机上。这意味着可能你会在不经意间push一些你原本没打算push的分支。
push.default设置成simple的意思是:git push仅仅把当前所在分支push到从当初git pull pull下来的那个对应分支上,另外,这个过程也会同时检查各个分支的名称是否相对应。
可以直接参考hiho一下的详细解答:http://hihocoder.com/discuss/question/2736/
下面是我的解题报告:
1.该题主要是统计三种颜色的字母的个数,red,yellow,blue;
2.需要注意的是,必须要判断字符是否为字母的情况,题目提到空格不加入统计。
3.思路:
使用栈存储和消除颜色,如果遇到<XXX>,则压入栈,如果遇到</XXX>,则pop出栈顶的元素,字母的颜色即栈顶的颜色。如果栈为空,则字母不统计。
Little Hi is writing an algorithm lecture note for Little Ho. To make the note more comprehensible, Little Hi tries to color some of the text. Unfortunately Little Hi is using a plain(black and white) text editor. So he decides to tag the text which should be colored for now and color them later when he has a more powerful software such as Microsoft Word.
There are only lowercase letters and spaces in the lecture text. To mark the color of a piece of text, Little Hi add a pair of tags surrounding the text, <COLOR> at the beginning and </COLOR> at the end where COLOR is one of “red”, “yellow” or “blue”.
Two tag pairs may be overlapped only if one pair is completely inside the other pair. Text is colored by the nearest surrounding tag. For example, Little Hi would not write something like “<blue>aaa<yellow>bbb</blue>ccc</yellow>”. However “<yellow>aaa<blue>bbb</blue>ccc</yellow>” is possible and “bbb” is colored blue.
Given such a text, you need to calculate how many letters(spaces are not counted) are colored red, yellow and blue.
Input contains one line: the text with color tags. The length is no more than 1000 characters.
Output three numbers count_red, count_yellow, count_blue, indicating the numbers of characters colored by red, yellow and blue.
<yellow>aaa<blue>bbb</blue>ccc</yellow>dddd<red>abc</red>
3 6 3
AC代码:
[c language=”++”]
//#include<string>
//#include<stack>
//#include<unordered_set>
//#include <sstream>
//#include "func.h"
//#include <list>
#include <iomanip>
#include<unordered_map>
#include<set>
#include<queue>
#include<map>
#include<vector>
#include <algorithm>
#include<stdio.h>
#include<iostream>
#include<string>
#include<memory.h>
#include<limits.h>
#include<stack>
using namespace std;
int getTagColor(string &str, int start)
{//红色返回0,黄色返回1,蓝色返回0
if (start < str.size())
{
if (start < str.size())
{
if (str[start] == ‘r’&&
start + 2 < str.size() &&
str[start + 1] == ‘e’&&
str[start + 2] == ‘d’)
return 0;
else if (str[start] == ‘y’&&
start + 5 < str.size() &&
str[start + 1] == ‘e’&&
str[start + 2] == ‘l’&&
str[start + 3] == ‘l’&&
str[start + 4] == ‘o’&&
str[start + 5] == ‘w’)
return 1;
else if (str[start] == ‘b’&&
start + 3 < str.size() &&
str[start + 1] == ‘l’&&
str[start + 2] == ‘u’&&
str[start + 3] == ‘e’)
return 2;
else return -4;
}
else return -4;
}
else return -4;
}
int getTag(string &str, int start)
{//获得标签的属性即颜色,属性包括颜色是开始还是结束
if (start < str.size())
{
if (str[start] == ‘<‘)
{
//颜色结束
if (start + 1 < str.size() && str[start + 1] == ‘/’)
return getTagColor(str, start + 2) + 3;
//颜色开始
else
return getTagColor(str, start + 1);
}
else return -1;
}
else return -1;
}
int main(void)
{
string text;
getline(cin , text);
stack<int> colorTag;
int times[3] = { 0 };
for (int i = 0; i < text.size(); i++)
{
int tag = getTag(text, i);
if (tag >= 0)
{
if (tag >= 3 && !colorTag.empty())
{//为颜色结束
colorTag.pop();
if (tag == 3) i += (3 + 2); //红色,跳过5个字符,包括’/’和最后的’>’
else if (tag == 4) i += (6 + 2);//黄色,跳过8个字符
else if (tag == 5) i += (4 + 2);//蓝色,跳过6个字符
}
else if (tag >= 0)
{
colorTag.push(tag);
if (tag == 0) i += (3+1); //红色,跳过3个字符,包括最后的’>’
else if (tag == 1) i += (6+1);//黄色,跳过6个字符
else if (tag == 2) i += (4+1);//蓝色,跳过4个字符
}
}
else if (!colorTag.empty() &&( (text[i] >= ‘a’&&text[i] <= ‘z’) || (text[i] >= ‘A’&&text[i] <= ‘Z’)))
{//栈不为空,需要注意判断为字母,题目提到空格不统计
times[colorTag.top()]++;
}
}
printf("%d %d %d\n", times[0],times[1], times[2]);
return 0;
}
[/c]
最大k乘问题
设I是一个n位十进制整数。如果将I划分为k段,则可得到k个整数。这k个整数的乘积称为I的一个k乘积。设计一个算法,对于给定的I和k,求出I 的最大k乘积。
一、思路:
1)我们定义dp[i][j]为数字I的前i为分成j段时的最大j乘积,如数字123,则dp[1][1]=1,dp[2][1]=12,dp[3][1]=123,dp[2][2]=2,如此类推。
2)那么我们来推导dp[i][j]与dp[i-x][j-1],其中x<i,假设我们已经知道所有m<i,n<j取值时的dp[m][n],构成dp[i][j]的可能为dp[i-1][j-1]*num[1..i],dp[i-2][j-1]*num[2..i],dp[i-3][j-1]*num[3..i],dp[i-4][j-1]*num[4..i]……
所以我们把数字num[123…x….i]分为两部分,其中第一部分为num[123…i-x],第一部分的最大乘积为dp[i-x][j-1],第二部分为num[x..i],则dp[i][j]=max(dp[i-x][j-1]* num[x..i])。
3)经过上述分析,我们可以把求I的最大k乘积划分为若干个子问题,这些子问题均为求最大乘积问题,然后通过这些最大乘积计算出I的最大k乘积,满足动态规划的最有自结构和无后向性性质。
4)已知数字I的位数为n,通过上述分析,求取dp[i][j]需要遍历O(n),计算dp[1][1]到dp[n][k]需要遍历O(n*k)的时间复杂度,总共需要O(n*n*k)的时间复杂度。
下列测试通过暴力搜索进行比较,验证了算法的正确性:
| 1234567890 | 最优分解 | 最大k乘积 |
| k=1 | 1234567890 | 1234567890 |
| k=2 | 12345678 90 | 1111111020 |
| k=3 | 1234567 8 90 | 888888240 |
| k=4 | 123456 7 8 90 | 622218240 |
| k=5 | 12345 6 7 8 90 | 373312800 |
| k=6 | 1234 5 6 7 8 90 | 186580800 |
| k=7 | 123 4 5 6 7 8 90 | 74390400 |
| k=8 | 12 3 4 5 6 7 8 90 | 21772800 |
| k=9 | 1 2 3 4 5 6 7 8 90 | 3628800 |
| k=10 | 1 2 3 4 5 6 7 8 9 0 | 0 |
二、复杂度分析
根据上述算法,时间复杂度为O(n*n*k),空间复杂度为O(n*k)。
三、源代码:
[c language=”++”]
//#include<string>
//#include <iomanip>
#include<set>
#include<queue>
#include<map>
//#include<unordered_set>
#include<unordered_map>
//#include <sstream>
//#include "func.h"
//#include <list>
#include<stdio.h>
#include<iostream>
#include<string>
#include<memory.h>
#include<limits.h>
#include<stack>
#include<vector>
#include <algorithm>
using namespace std;
/*
函数名 :str2long
函数功能:把str转化long long
*/
long long str2long(string str)
{
long long result = 0;
for (int i = 0; i < str.size(); i++)
{//逐位转化
result = result * 10 + str[i] – ‘0’;
}
return result;
}
/*
函数名 :devideNumber
函数功能:求出str的最大k乘积
*/
long long devideNumber(string I, int k, vector<vector<int>>&trace)
{
//n表示I的位数
int n = I.size();
//dp[i][j]表示把I前i位分成j段时的最大乘积
vector<vector<long long>> dp(I.size()+1, vector<long long>(k+1));
//初始化分成1段的时候
for ( int i = 1; i <=n; i++)
dp[i][1] = str2long(I.substr(0,i));
//求解dp[i][j],其中j<=i,i位数字最多划分为i段,所以j不超过i
for (int i = 2; i <=n; i++)
{
for (int j = 2; j <=k && j<=i; j++)
{
long max=0;
for (int m = 1; m < i; m++)
{//把前i位分为两部分,一部分是0~m-1,另外一部分是m~i
int tmp = dp[m][j – 1] * str2long(I.substr(m, i-m));
if (tmp >=max)
{
max = tmp;
//trace的意义是dp[i][j]取得最大值时,最后一个数字为m~i-1
trace[i][j] = m;
}
}
dp[i][j] = max;
}
}
return dp[I.size()][k];
}
int main(void)
{
cout << "|—————————————————————————|\n";
cout << "| 算法实现题7 |\n";
cout << "| |\n";
cout << "| 设 I 是一个n位十进制整数,如果把I划分为k段,则可得到k个整数。 |\n";
cout << "| 这k个整数的乘积称为I的一个k乘积。给定I和k,求出I的最大k乘积。 |\n";
cout << "| |\n";
cout << "|—————————————————————————|\n";
while (1)
{
string I;
int k;
cout << "请输入I的值(输入负数退出):" << endl;
cin >> I;
if (I[0] == ‘-‘) break;
cout << "请输入划分的段数k:" << endl;
cin >> k;
//异常检测
if (I.size() < k)
{
cout << "输入不合要求!k不能超过I的位数!"<<endl<<
"您输入的I的位数为" << I.size() << ",k的值为" << k << ",请重新输入。" << endl << endl;
continue;
}
else if (k < 1)
{
cout << "k的取值至少为1!请重新输入!" << endl;
}
//trace记录I求出最大k乘积后,每个位置所取的位数
vector<vector<int>> trace(I.size()+1,vector<int>(k+1));
int result=devideNumber(I, k, trace);
cout << "最大k乘积为:" << endl << result << endl;
//回溯分成的段
stack<string> sta;
int tmp = I.size();
for (int i = 0; i < k; i++)
{//通过trace把分成的段记录下来
sta.push(I.substr(trace[tmp][k – i], tmp – trace[tmp][k – i]));
tmp = trace[tmp][k – i];
}
cout << "分成的各段为:" << endl;
while (!sta.empty())
{
cout << sta.top() << " ";
sta.pop();
}
cout << endl<<endl;
}
return 0;
}
[/c]
在默认的STL中,priority_queue一般是大根堆,如果想要改成小根堆或者自定义数据类型,就需要写仿函数,例子如下:
[c language=”++”]
struct cmp
{
bool operator()(const int&a, const int&b)
{//小根堆
return a > b;
}
};
priority_queue<int, vector<int>, cmp> minHeap;
[/c]
需要说明的是,需要return a>b,这样才构成小根堆,因为原STL中,调用的是a<b操作构成的大根堆。
如果需要自定义数据结构,同样采取上述办法即可。
安装了centOS后,发现display选项里面只有1024*768和800*600的选项,而显示屏是1920*1080的。于是开始想办法进行分辨率的适配。
通过查资料知道,修改分辨率主要有两种方法:
方法一:使用xorg.conf文件(这个方法失败了!原因尚未找到,想要解决办法的童鞋可以直接看第二种方法)
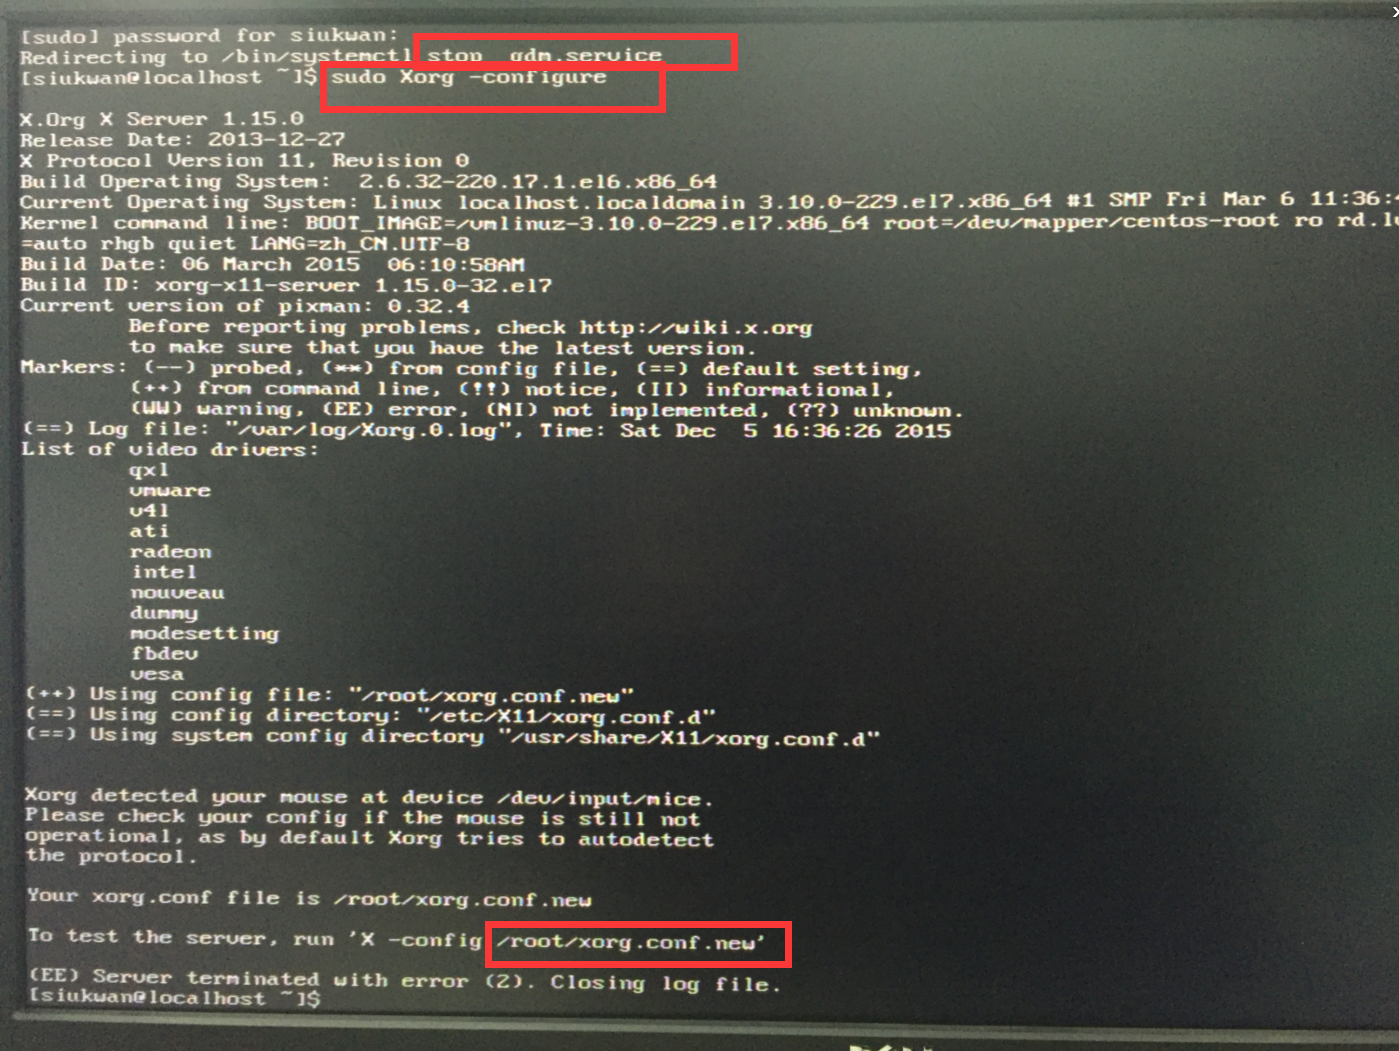
这个时候就可以进入桌面系统修改分辨率了。首先使用cvt命令生成modeline,生成一些配置信息。然后把这个配置信息添加到xorg.conf的section“Monitor”中(这个修改需要在root用户下面进行),如下图:

然后,理论上已经修改了分辨率,重启后也会正常的,但是实际没有效果!!失败了。。原因待查。
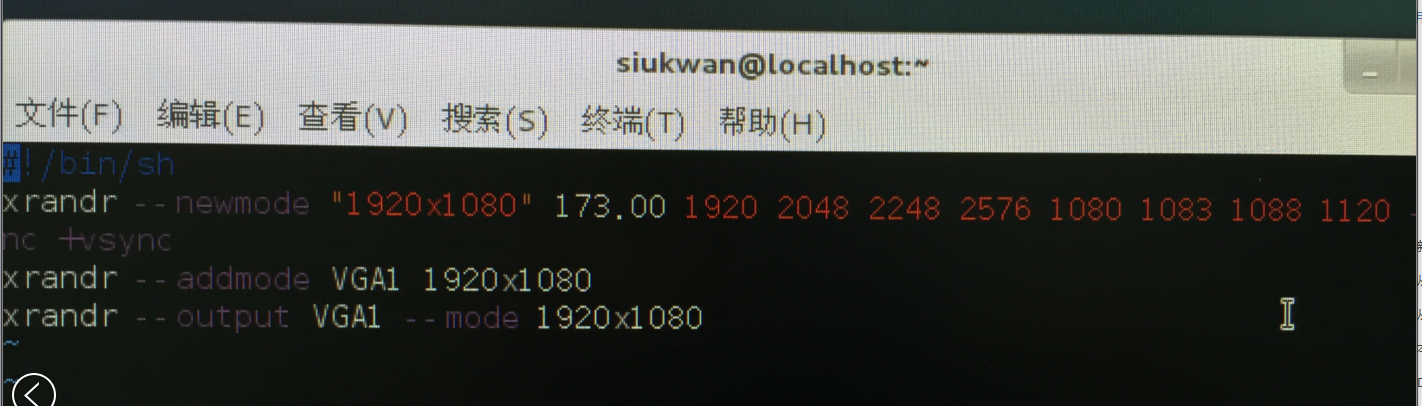
方法二:使用xrandr+开机启动选项进行修改。
同样还是先使用cvt生成modeline信息,然后用以下三行xrandr命令进行更改,效果立竿见影!红色部分为cvt生成的modeline信息,去掉了“modeline”字串(必须去掉)。
[shell]
xrandr –newmode <span style="color: #ff0000;">"1920×1080" 173.00 1920 2048 2248 2576 1080 1083 1088 1120 -hsync +vsync</span>
xrandr –addmode VGA1 1920×1080
xrandr –output VGA1 –mode 1920×1080
[/shell]
 当然,这种办法不是永久的,每次重启都需要重新设置。
为了使每次开机都执行上述的命令,把上述三个指令写到sh文件中去,如上图,我命名为change-resolution.sh。
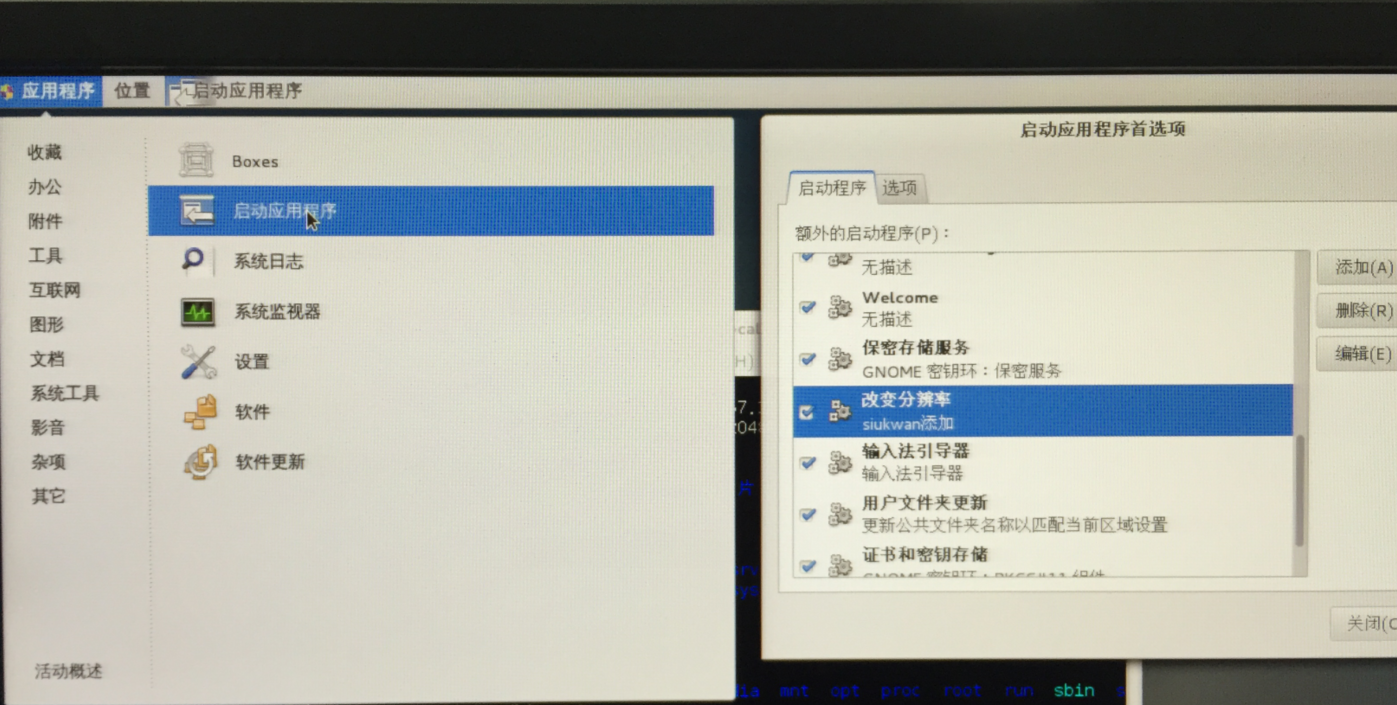
然后需用使用chmod u+x change-resolution.sh更改为可执行文件,在应用程序->系统工具->启动应用程序中,添加这个脚本即可。
1.题目给出n个学生,编号为0~n-1,并给出每个学生的兴趣,求有共同兴趣的学生团体数量,和每个团体的学生数目。
2.仔细观察测试例子,发现凡是有相同兴趣的同学,都可以归为一类,并不需要团体里所有的学生都有共同兴趣,譬如学生0有兴趣A,学生1有兴趣A、B,学生2有兴趣B,那么0和1有共同兴趣A,归为一类,而2和1有共同兴趣B,所以也把2归在1所在的类,所以这个团体有3个学生。
3.主要是考察并查集。我们把每个学生的兴趣都合并到第一个兴趣所在的集合,然后统计每个学生的第一个兴趣属于哪个集合,从而把学生归到相应的集合。
When register on a social network, you are always asked to specify your hobbies in order to find some potential friends with the same hobbies. A “social cluster” is a set of people who have some of their hobbies in common. You are supposed to find all the clusters.
Input Specification:
Each input file contains one test case. For each test case, the first line contains a positive integer N (<=1000), the total number of people in a social network. Hence the people are numbered from 1 to N. Then N lines follow, each gives the hobby list of a person in the format:
Ki: hi[1] hi[2] … hi[Ki]
where Ki (>0) is the number of hobbies, and hi[j] is the index of the j-th hobby, which is an integer in [1, 1000].
Output Specification:
For each case, print in one line the total number of clusters in the network. Then in the second line, print the numbers of people in the clusters in non-increasing order. The numbers must be separated by exactly one space, and there must be no extra space at the end of the line.
Sample Input:
8
3: 2 7 10
1: 4
2: 5 3
1: 4
1: 3
1: 4
4: 6 8 1 5
1: 4
Sample Output:
3
4 3 1
AC代码:
[c language=”++”]
//#include<string>
//#include <iomanip>
#include<vector>
#include <algorithm>
//#include<stack>
#include<set>
#include<queue>
#include<map>
//#include<unordered_set>
#include<unordered_map>
//#include <sstream>
//#include "func.h"
//#include <list>
#include<stdio.h>
#include<iostream>
#include<string>
#include<memory.h>
#include<limits.h>
using namespace std;
bool cmp(const int&a, const int&b)
{
return a > b;
}
int find(int x, map<int, int>&r)
{
if (r[x] == 0)
{//利用题目中兴趣大于0的特点,进行初始化
r[x] = x;
return x;
}
else if (r[x] == x)
return x;//如果代表就是自己,则返回x
else
{//如果代表不是自己,就把自己的代表更改为自己的代表的代表
r[x] = find(r[x], r);
return r[x];
}
}
int main(void)
{
int total;
scanf("%d", &total);
map<int, int> r;
vector<int> student(total);
for (int i = 0; i < total; i++)
{
int sum;
scanf("%d:", &sum);
//把第一个兴趣当作代表
int firstITR;
scanf("%d", &firstITR);
r[firstITR] = find(firstITR, r);//找出代表
student[i] = r[firstITR];
for (int j = 1; j < sum; j++)
{
int tmp;
scanf("%d", &tmp);
r[find(tmp, r)] = r[firstITR];//把tmp和firstITR合并
}
}
map<int, int> interestSet;
for (int i = 0; i < student.size(); i++)
{//找出各个学生所属的兴趣集合,把这个集合的人数++
interestSet[find(student[i], r)]++;
}
vector<int> ans(0);
for (map<int, int>::iterator ite = interestSet.begin(); ite != interestSet.end(); ite++)
{//把兴趣统计放到vector中
ans.push_back(ite->second);
}
//进行排序
sort(ans.begin(), ans.end(), cmp);
printf("%d\n", ans.size());
for (int i = 0; i < ans.size(); i++)
{
printf("%d", ans[i]);
if (i != ans.size() – 1)
printf(" ");
}
printf("\n");
return 0;
}
[/c]